August Statistics


Cold Lake is no longer Alberta’s best-kept secret. More and more buyers—from young families to retirees—are turning their attention to this scenic community, and it’s easy to see why.
1. Lifestyle by the Lake
With beautiful waterfront views, sandy beaches, and year-round recreation, Cold Lake offers a lifestyle that’s hard to beat. Whether you love boating in the summer or ice fishing in the winter, nature is right outside your front door.
2. Affordable Real Estate Options
Compared to larger centres, Cold Lake remains affordable. From starter homes to executive properties, there’s something for every budget. Military families posted to 4 Wing Cold Lake also benefit from a steady housing market and supportive community.
3. Growth & Investment Opportunity
With a stable local economy, supported by the military base, oil & gas, and tourism, Cold Lake continues to grow. Savvy investors are recognizing the long-term value of owning property here.
4. Strong Sense of Community
Cold Lake is known for its friendly atmosphere and safe, welcoming neighbourhoods. With excellent schools, local businesses, and year-round events, it’s a great place to put down roots.
Thinking of buying or selling in Cold Lake?
Whether you’re relocating, investing, or ready for a change, I’m here to help you navigate the Cold Lake real estate market. Let’s chat about your goals!

🏛 Minority Government = Shorter Timelines & More Negotiation
With the Liberals falling short of a majority, they'll need to work with other parties to pass legislation—something that can create short-term policy shifts. Historically, minority governments last about 17 months, so we can expect a tighter window for any meaningful housing reforms.
🏡 Housing Supply & Affordability Front and Centre
The Liberal platform included major housing initiatives, including:
A goal to build 500,000 homes per year (an ambitious target we’ve never hit).
$25B Build Canada Homes program focused on government-led prefab builds on federal lands.
GST elimination for first-time buyers on homes under $1 million.
Development charge reductions for multi-unit builds to boost affordability.
While the timelines and execution remain to be seen, it’s encouraging to see continued political pressure to address inventory and affordability. That said, the supply-side fixes will take time, so demand pressure may remain high in the near term.
📉 Mortgage Rate Outlook
Fixed rates may trend lower if larger deficits result in more bond issuance and declining yields—but this will depend on how financial markets respond to the June budget.
Variable-rate discounts are shrinking. Even with possible Bank of Canada cuts later this year, new variable products might not offer the same savings we’ve seen in the past.
📅 What to Watch For
The federal budget, expected in June, will be key. It will tell us how the government plans to fund these housing and infrastructure plans and what impact that could have on inflation, lending policy, and rates.

As a real estate agent, I know how important it is to make your home feel inviting, stylish, and up-to-date—whether you’re preparing to sell or simply refreshing your space. The latest home décor trends for 2025 focus on sustainability, warmth, and personalized style. Let’s dive into what’s trending and how you can incorporate these ideas into your home.
Warm, grounding colors are taking center stage in 2025. Think rich browns, deep greens, terracotta, and soft neutrals. These tones create a cozy and organic feel, perfect for making a space feel inviting. Consider adding a statement wall in a warm, earthy hue or incorporating natural wood and stone textures into your décor.
Lighting is no longer just functional—it’s a design feature. Oversized pendant lights, sculptural lamps, and layered lighting (a mix of ceiling, table, and floor lamps) are a must. Brass and matte black fixtures continue to be popular, adding a touch of modern elegance to any space.
Eco-conscious decorating is a big trend, with more homeowners choosing vintage and thrifted pieces over mass-produced furniture. Not only is this approach sustainable, but it also adds unique character to a space. Look for high-quality secondhand pieces that can be refreshed with new upholstery or paint.
Straight lines are making way for soft, organic shapes. Rounded sofas, arched doorways, and curved accent chairs create a more relaxed and inviting atmosphere. This trend works especially well in living rooms, where comfort and coziness are key.
Wallpaper is making a comeback in a big way. Bold floral, geometric, or textured designs are being used to create statement walls in bedrooms, living spaces, and even powder rooms. If you’re not ready for full wallpaper, consider textured wall treatments like limewash or wainscoting for added depth.
Plush, inviting materials are a must in 2025. Bouclé, velvet, and chunky knits add warmth and sophistication to any space. Layer these textures through throw blankets, upholstered furniture, and soft area rugs to create a cozy and stylish home.
With remote work and flexible living arrangements becoming the norm, homes are being designed with versatility in mind. Built-in desks, hidden storage solutions, and convertible furniture allow rooms to serve multiple purposes while maintaining a stylish look.
Plants continue to be a major décor trend, but this year, it’s all about incorporating greenery in a more intentional way. Living walls, large potted trees, and nature-inspired artwork help create a calming environment that promotes well-being.
Whether you’re staging your home to sell or simply want to update your space, these 2025 home décor trends will add warmth, style, and functionality to your home. Looking for personalized advice on how to boost your home’s appeal? Let’s chat—I’d love to help you make the most of your space!

1. Increased Insured Mortgage Cap
The maximum property value eligible for insured mortgages has been raised from $1 million to $1.5 million. This adjustment allows buyers to purchase higher-priced homes with a down payment of less than 20%, broadening access to more expensive properties.
2. Extended Amortization Periods
First-time homebuyers and purchasers of new builds can now opt for mortgage amortization periods of up to 30 years, an increase from the previous 25-year limit. This extension reduces monthly mortgage payments, making homeownership more attainable.
3. Simplified Lender Switching at Renewal
Effective November 21, 2024, borrowers can switch lenders upon mortgage renewal without undergoing a new stress test, provided the mortgage amount and terms remain unchanged. This change promotes competition among lenders and offers borrowers more flexibility to secure favorable terms.
Implications for Cold Lake Homebuyers
Broader Property Options: With the increased insured mortgage cap, buyers in Cold Lake can consider a wider range of properties without the necessity of a 20% down payment.
Affordable Monthly Payments: The option for a 30-year amortization period can lower monthly payments, easing the financial burden for first-time buyers and those investing in new constructions.
Enhanced Flexibility at Renewal: The ability to switch lenders without a new stress test at renewal empowers homeowners to negotiate better mortgage terms, potentially leading to cost savings.
Considerations
While these changes aim to improve housing affordability, it's essential to recognize that extended amortization periods may result in higher overall interest payments over the life of the mortgage. Additionally, increased borrowing capacity could contribute to higher property prices due to elevated demand.
Conclusion
The recent mortgage rule changes present new opportunities for homebuyers in Cold Lake. However, it's crucial to assess your financial situation carefully and consult with a mortgage professional to understand how these updates align with your homeownership goals.


As a full time realtor in Cold Lake, AB I've had the privilege of assisting countless individuals and families in finding their dream homes. The process of buying a home can be both exhilarating and daunting, especially for first-time buyers or those unfamiliar with the intricacies of the Alberta real estate market. In this blog post, I aim to provide a comprehensive guide to navigating the home buying journey in Alberta.
Preparation is Key: Before diving into the home search process, it's crucial to assess your financial situation and determine your budget. This involves obtaining pre-approval for a mortgage, which will give you a clear understanding of how much you can afford to spend on a home. Additionally, take some time to identify your priorities and preferences in terms of location, amenities, and property features.
Engage with a Realtor: Partnering with a knowledgeable and experienced realtor is invaluable when buying a home in Cold Lake. A reputable real estate agent can offer expert guidance, help you navigate the complexities of the market, and negotiate on your behalf. They can also provide valuable insights into local neighborhoods, schools, and amenities to ensure you find the perfect home for your needs.
Start the Search: Once you've defined your budget and preferences, it's time to start searching for properties. Your realtor can set up personalized property alerts to notify you of new listings that match your criteria. Be prepared to attend open houses, schedule viewings, and explore different neighborhoods to get a sense of what each area has to offer.
Make an Offer: When you find a property that ticks all the boxes, your realtor will guide you through the process of making an offer. They will help you determine an appropriate price based on market conditions, comparable sales, and the condition of the property. Your offer will typically include conditions such as a home inspection and financing approval, which protect your interests as a buyer.
Due Diligence: Once your offer is accepted, it's time to conduct due diligence on the property. This may involve hiring a home inspector to assess the condition of the home and identify any potential issues. Your realtor can recommend trusted professionals to assist with this process and ensure that you have all the information you need to make an informed decision.
Finalizing the Purchase: Assuming all conditions are met satisfactorily, you'll proceed to finalize the purchase of the property. This involves working closely with your realtor, mortgage lender, and legal representative to complete the necessary paperwork and arrange for the transfer of ownership. Your realtor will coordinate the closing process and ensure that everything proceeds smoothly.
Celebrate and Settle In: Congratulations, you're now a homeowner! Take some time to celebrate this exciting milestone and start planning your move. Your realtor can provide recommendations for local movers, contractors, and other services to help make the transition as seamless as possible.
In conclusion, buying a home in Cold Lake, AB, can be a rewarding experience with the right guidance and support. By following these steps and partnering with a trusted realtor, you can navigate the home buying journey with confidence and find the perfect place to call home. If you're ready to embark on this exciting adventure, don't hesitate to reach out to me for personalized assistance and expert advice. Happy house hunting!


Embarking on the journey of buying a new home is a thrilling adventure filled with possibilities. As you navigate the real estate market in search of your dream property, I'm here to be your trusted guide. Let's explore the essential steps to ensure a smooth and successful home-buying experience.
1. Define Your Needs and Wants:
Start by creating a list of your must-haves and preferences. Consider factors such as location, size, amenities, and style. This will serve as a roadmap for your home search and help narrow down your options.
2. Get Pre-Approved for a Mortgage:
Knowing your budget is crucial in the home-buying process. Seek pre-approval for a mortgage to understand your financial capabilities. This not only strengthens your negotiating position but also streamlines the process once you find the perfect home.
3. Partner with a Skilled Real Estate Agent:
Choosing the right real estate agent is a key step in your home-buying journey. An experienced agent understands the local market, can pinpoint suitable properties based on your preferences, and will guide you through the entire process, from showings to negotiations and closing.
4. Explore Available Properties:
Your agent will curate a list of homes that match your criteria. Attend open houses, schedule private viewings, and take the time to explore various neighborhoods. Don't rush—finding the perfect home takes time, and patience is your ally in this process.
5. Conduct Due Diligence:
Once you've identified a property of interest, conduct thorough due diligence. This includes inspections, reviewing property records, and understanding any potential zoning or neighborhood issues. A well-informed buyer is an empowered buyer.
6. Make an Informed Offer:
When you find the home that checks all the boxes, work closely with your real estate agent to craft a competitive and well-informed offer. Consider market conditions, recent comparable sales, and any unique factors that may impact the negotiation process.
7. Navigate the Escrow Process:
Once your offer is accepted, you'll enter the escrow period. During this time, inspections and appraisals will take place, and the necessary paperwork will be finalized. Your real estate agent will coordinate with all parties involved to ensure a smooth and efficient closing.
8. Close the Deal:
Congratulations, you're almost there! The final step involves signing the necessary documents and officially closing the deal. Your real estate agent will guide you through this process, ensuring all the details are in order for a successful and stress-free closing.
Buying a home is a significant milestone, and with the right guidance, it can be an exciting and rewarding experience. Let me be your partner in finding the home that fits your lifestyle and fulfills your dreams. Contact me today to start your journey towards homeownership!


Coldwell Banker Lifestyle proudly celebrates the outstanding achievements of our 2023 award recipients, recognizing their exceptional performance.
Congratulations to Robin Tobias on achieving Diamond Society!
Robin’s kind and professional approach, combined with her extensive knowledge in real estate, defines her as a standout professional who not only guides clients with expertise but also ensures a supportive and positive experience.
Be sure to check out Robin’s Facebook account here: Robin Tobias- Cold Lake & Area Real Estate

Are you considering selling your home and entering the dynamic real estate market? The process of selling a home can be both exciting and daunting, but with the right guidance, you can make it a smooth and rewarding experience. As your trusted real estate partner, I'm here to provide you with a comprehensive guide to help you navigate every step of the way.
1. Strategic Planning:
Before you list your property, take some time to assess your goals and expectations. Work closely with your real estate agent to establish a clear strategy, including pricing, marketing, and a timeline for the sale. This foundational step lays the groundwork for a successful selling journey.
2. Home Preparation:
First impressions matter, and presenting your home in the best possible light is key. Consider investing time and effort into minor repairs, decluttering, and staging. A well-maintained and visually appealing property is more likely to attract potential buyers and generate higher offers.
3. Pricing Your Home Right:
Determining the right asking price is a delicate balance. Your real estate agent will conduct a thorough market analysis to identify comparable sales and market trends. Pricing your home competitively ensures it stands out among the competition and attracts serious buyers.
4. Effective Marketing:
In today's digital age, an online presence is crucial. Your real estate agent will employ a multi-faceted marketing approach, utilizing professional photography, virtual tours, and social media to showcase your property to a broad audience. A compelling listing can make all the difference in attracting interested buyers.
5. Showcasing Your Home:
Make your home accessible for showings and open houses. Buyers often want to envision themselves living in the space, so creating a warm and inviting atmosphere is essential. During showings, highlight the unique features of your home and be open to answering any questions potential buyers may have.
6. Negotiating Offers:
When offers start rolling in, your real estate agent will guide you through the negotiation process. Be prepared to weigh various factors, including price, contingencies, and closing timelines. Your agent's expertise is invaluable in securing the best deal for your property.
7. Closing the Deal:
Once you've accepted an offer, the closing process begins. This involves inspections, appraisals, and finalizing the necessary paperwork. Your real estate agent will coordinate with all parties involved to ensure a smooth and efficient closing, bringing you one step closer to successfully selling your home.
Selling your home is a significant undertaking, but with the right real estate partner, it can be a rewarding and seamless process. Trust in my experience and dedication to guide you through each step, making your home-selling journey a successful one. Contact me today to get started on turning your real estate goals into reality!

Renovations that provide the highest return on investment often include:
Kitchen Remodeling: Updating the kitchen, including new appliances, countertops, and cabinets, is a popular and lucrative renovation.
Bathroom Upgrades: Modernizing bathrooms with new fixtures, tiles, and amenities can significantly increase a home's value.
Curb Appeal Enhancements: Improving the exterior with landscaping, a fresh coat of paint, or a new front door can make a lasting impression.
Adding a Deck or Patio: Outdoor living spaces are increasingly popular, and adding a deck or patio can enhance both functionality and appeal.
Attic or Basement Conversions: Transforming unused spaces into livable areas, such as an additional bedroom or recreational space, adds value.
Energy-Efficient Upgrades: Installing energy-efficient windows, insulation, or upgrading to smart home features can attract environmentally conscious buyers.
Flooring Updates: Upgrading flooring, especially to hardwood or high-quality laminate, can give a home a fresh, modern look.
Home Office Addition: With the rise of remote work, adding a dedicated home office space can be an attractive feature.
Smart Home Technology: Integrating smart home systems for security, lighting, and temperature control can enhance a home's appeal.
Garage Renovation: Converting a garage into a functional living space or improving its organization and aesthetics can be a valuable investment.
Before embarking on any renovation project, it's crucial to consider your budget, the local real estate market, and the preferences of potential buyers in your area.


Welcome to Cold Lake, Alberta – where the serene beauty of lakeside living meets the dynamic pulse of a thriving real estate market. As your trusted real estate partner, I'm excited to provide you with an in-depth look at the current trends, opportunities, and unique aspects of the Cold Lake housing landscape.
1. Steady Growth in Property Values:
Cold Lake has consistently demonstrated a positive trajectory in property values. The town's picturesque surroundings, combined with its strategic location, have positioned it as an attractive destination for prospective homeowners and investors alike. Whether you're seeking a cozy family home or a lakeside retreat, Cold Lake offers a diverse array of housing options to suit every lifestyle.
2. Diverse Housing Portfolio:
One of Cold Lake's standout features is its diverse housing portfolio. From charming single-family homes in family-friendly neighborhoods to modern condominiums offering maintenance-free living, our listings showcase the range of possibilities available to you. Explore lakefront properties that offer breathtaking views and waterfront access, providing an unparalleled living experience.
3. Lifestyle Appeal:
Cold Lake isn't just a place to live; it's a lifestyle. The town boasts a tight-knit community, excellent schools, and a wealth of recreational opportunities. Whether you're an outdoor enthusiast, a family with young children, or someone seeking tranquility by the lake, Cold Lake has something to offer for everyone.
4. Economic Influences:
The town's economic landscape is closely tied to the oil and gas industry and military base. Understanding these economic factors is crucial for both buyers and sellers. As the industry evolves, so does the real estate market. I'm well-versed in these dynamics, providing you with valuable insights to make informed decisions.
5. Investment Potential:
Cold Lake presents a unique investment opportunity. The town's strategic growth plans, coupled with the allure of lakeside living, make it a promising destination for real estate investment. Whether you're a first-time buyer, seasoned investor, or looking to upgrade, Cold Lake's market offers a range of possibilities to achieve your goals.
6. Personalized Guidance:
Navigating the real estate market can be complex, but you're not alone. I'm an experienced real estate professional here to guide you every step of the way. From property searches to negotiations and closing deals, I'm committed to ensuring a seamless and rewarding experience for my clients.
In conclusion, Cold Lake's real estate market is a vibrant tapestry of growth, diversity, and opportunity. Whether you're buying, selling, or investing, Cold Lake has something exceptional to offer. Reach out today to embark on your real estate journey in this thriving community – where your dream home awaits by the shimmering shores of Cold Lake.


Welcome to the enchanting world of Cold Lake, Alberta, where the skies come alive with the breathtaking spectacle of the Northern Lights. As a local realtor, I am excited to introduce you to one of the most mesmerizing natural wonders this region has to offer. Cold Lake's Northern Lights are not only a celestial spectacle but also a compelling reason to consider this charming community as your future home. In this blog, we'll delve into the beauty and allure of the Northern Lights in Cold Lake, providing you with yet another reason to fall in love with this incredible place.
1. The Natural Beauty of Cold Lake, AB:
Before we dive into the celestial show that Cold Lake has to offer, let's take a moment to appreciate the natural beauty that surrounds this community. Cold Lake is nestled in northeastern Alberta, and its pristine landscapes include vast forests, crystal-clear lakes, and abundant wildlife. The combination of natural splendor and the tranquility of this region makes it a hidden gem in Alberta.
2. The Northern Lights: A Celestial Masterpiece:
One of the most awe-inspiring phenomena that graces the night skies of Cold Lake is the Northern Lights, also known as the Aurora Borealis. These magnificent, dancing lights are a result of charged particles from the sun colliding with gases in the Earth's atmosphere. The outcome is a breathtaking display of colors and patterns that paint the night sky.
3. The Best Time to Witness the Northern Lights in Cold Lake:
If you're eager to witness the Northern Lights in all their glory, it's crucial to plan your visit during the optimal time. The best months to catch this celestial performance in Cold Lake are typically between September and April when the nights are at their darkest. This period offers the best chances to witness this awe-inspiring natural wonder.
4. Ideal Viewing Locations:
As a realtor, I can tell you that location matters, not just for Northern Lights enthusiasts but also for anyone considering Cold Lake as their home. Some excellent locations in and around Cold Lake for Northern Lights viewing include:
a. Cold Lake Provincial Park: This beautiful park offers a pristine setting and is away from the city lights, making it an ideal spot for stargazing and Aurora viewing.
b. Bonnyville Beach: Located just a short drive from Cold Lake, this beach offers a serene environment to marvel at the Northern Lights while enjoying the cool breeze from the lake.
5. Why Choose Cold Lake as Your Home:
Beyond the Northern Lights, Cold Lake boasts a vibrant community, excellent schools, a strong economy, and a wide range of recreational activities. Whether you're looking for a cozy family home, a peaceful lakeside retreat, or a place to start a new chapter in your life, Cold Lake offers a variety of real estate options to suit your needs.
6. Conclusion: Make Cold Lake, AB, Your Home Under the Northern Lights:
As a local realtor, I encourage you to explore the magic of Cold Lake, Alberta, not just for its stunning Northern Lights but also for the incredible lifestyle it offers. The Northern Lights are just one of the many wonders that make this region an attractive place to call home. If you're considering making the move to Cold Lake or want to learn more about the local real estate market, don't hesitate to reach out. I'd be delighted to help you find your dream home under the dazzling Northern Lights of Cold Lake.


Welcome to Cold Lake North, a hidden gem nestled amidst the stunning landscapes of Alberta, Canada. This picturesque region boasts breathtaking natural beauty, abundant outdoor activities, and a warm, welcoming community that will make you feel right at home. Join us as we embark on a virtual journey to discover the wonders of Cold Lake North and why it should be on every traveler's bucket list.
Cold Lake North is situated on the northeastern shores of the namesake Cold Lake, one of the largest and most pristine lakes in Alberta. The glistening waters of the lake provide a mesmerizing backdrop for all kinds of recreational activities, making it a paradise for nature enthusiasts and adventure seekers alike. The region's unspoiled forests, rolling hills, and tranquil beaches offer a sanctuary for relaxation and exploration.
No matter the time of year, Cold Lake North offers a plethora of outdoor activities to suit everyone's tastes. During the warm summer months, the lake becomes a hub for water sports such as boating, fishing, and kayaking. The sandy beaches are perfect for sunbathing and building sandcastles, while nearby hiking trails let you explore the region's natural wonders.
Come winter, the landscape transforms into a winter wonderland, inviting visitors to indulge in ice fishing, snowmobiling, and cross-country skiing. The opportunities for outdoor adventures are endless and will leave you with memories to cherish for a lifetime.
Cold Lake North has a rich aviation history and is renowned for the Canadian Forces Base Cold Lake. This airbase has been instrumental in training Canadian and international fighter pilots for decades. Visitors can learn about the fascinating world of aviation at the Cold Lake Air Force Museum, where displays of historic aircraft and captivating stories of heroism take center stage.
The region is also home to the Cold Lake First Nations, whose cultural heritage enriches the area. Embrace the opportunity to learn about the traditions, art, and history of the Indigenous people by engaging with the local community. Visitors can attend cultural events, workshops, and experience authentic Indigenous cuisine.
5. Community Spirit and Warm Hospitality
What sets Cold Lake North apart from other destinations is its sense of community and warm hospitality. The locals are friendly, welcoming, and always eager to share their love for the area. Whether you're a solo traveler, a couple seeking a romantic escape, or a family on vacation, you'll feel like a part of the community from the moment you arrive.
Cold Lake North in Cold Lake, AB, Canada, is a haven for nature enthusiasts, history buffs, and anyone seeking a memorable and authentic Canadian experience. With its stunning landscapes, diverse outdoor activities, rich aviation history, and Indigenous heritage, this region has something to offer every traveler. So, pack your bags and prepare for an unforgettable adventure in Cold Lake North. Discover its enchanting beauty, create lasting memories, and immerse yourself in the warmth of its community. Whether you're a seasoned explorer or a first-time visitor, Cold Lake North is sure to leave a lasting impression on your heart.

The Municipal District of Bonnyville, located in northeastern Alberta, is a beautiful and diverse area with a lot to offer. Spanning over 10,000 square kilometers, it is home to both rural communities and small urban centers. Let's take a closer look at what makes this area so special.
One of the most notable features of the M.D. of Bonnyville is its natural beauty. With vast expanses of pristine wilderness, including forests, lakes, and rivers, there are endless opportunities for outdoor recreation. Whether you enjoy hiking, fishing, hunting, or camping, this area has it all. It is also home to several popular parks, including Moose Lake Provincial Park and Cold Lake Provincial Park, which offer a range of amenities and activities for visitors.
In addition to its natural attractions, the M.D. of Bonnyville has a rich cultural history that is worth exploring. The area has been inhabited by various Indigenous peoples for thousands of years, and their presence is still felt today. Visitors can learn about the history and traditions of these communities by visiting museums and cultural centers throughout the area.
For those who prefer a more urban experience, the M.D. of Bonnyville has several towns and villages that offer all the amenities of modern life. Bonnyville, the largest town in the area, has a thriving economy and is home to a wide range of businesses and services. Other communities in the area, such as Glendon and Elk Point, also offer unique attractions and opportunities.
Overall, the M.D. of Bonnyville is a wonderful place to visit or call home. With its stunning natural beauty, rich cultural heritage, and thriving communities, there is something for everyone in this unique corner of Alberta.

All-white bathrooms were once celebrated for their clean lines, simplicity and spa-like aura. But such muted designs are now falling to the wayside in favor of more color, texture and patterns. Dark cabinets, wallpaper and patterned tiles are top bathroom trends this year, according to the latest survey from Fixr(link is external), an online home remodeling resource. Fixr surveyed 60 design experts to find out the hottest bathroom aesthetics.
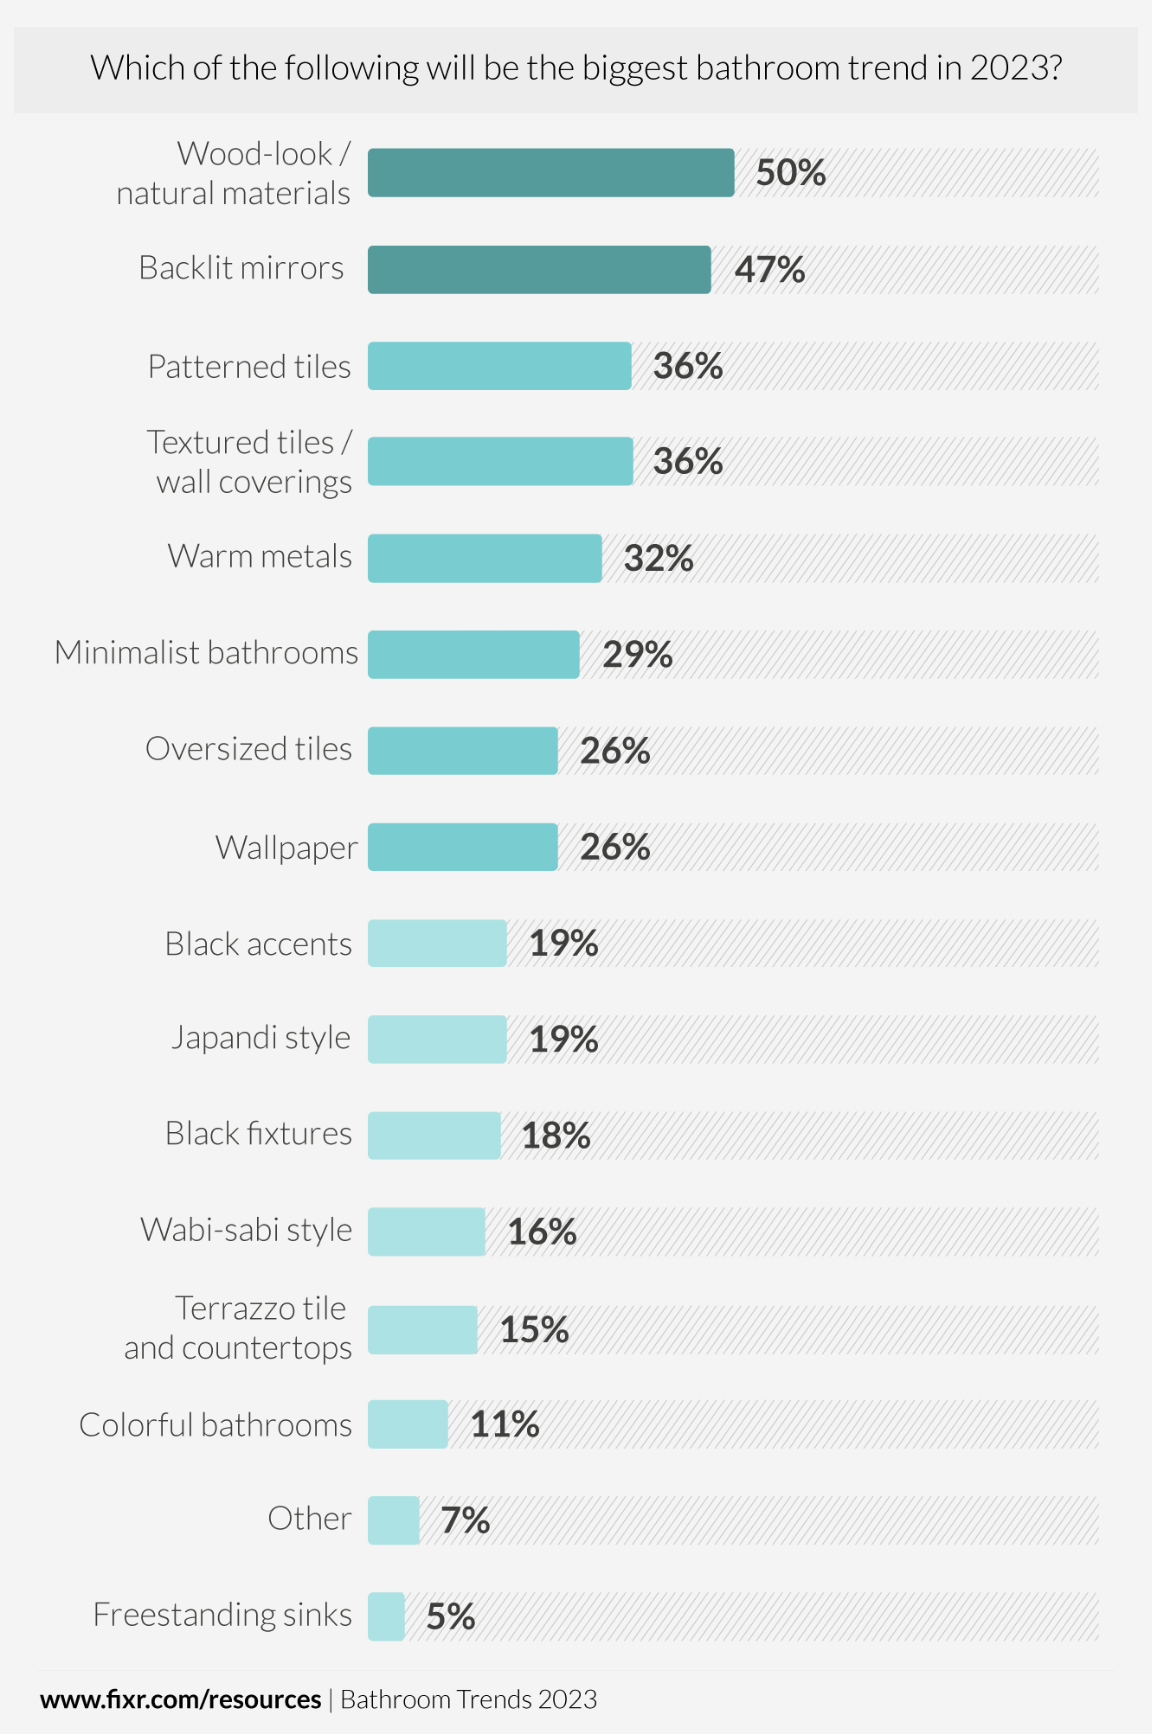
Darker cabinets: Cabinets made from natural materials that provide a grainier, wood-like aesthetic are gaining favor. Japandi and Wabi-sabi styles, which emphasize natural materials, are inspiring some of these wood tones. The wood can have unique variations to help create contrast against otherwise mostly white finishes.

Backlit mirrors: Nearly half of designers believe backlit mirrors, which provide light around their perimeter, will be popular this year. “A backlit mirror works two-fold: It offers ambient lighting to the room, which is perfect for relaxing … but also serves as task lighting,” Fixr notes in its report. Many of these mirrors also include features like anti-fogging and magnifiers.

Patterned tiles: Homeowners are showing a willingness to experiment with bolder choices for their floors and walls. Patterned and textured tile and wall coverings are bringing added dimension and depth to spaces. Thirty-six percent of designers called this the biggest bathroom trend of the year. The tile patterns may be geometric, such as hexagons and herringbone, or vintage, such as an octagon dot pattern. Fixr also notes that marble tiles are coming in many different colors and patterns, such as black marble with contrasting white veining.


From creating a warm, inviting space in your home, to clearing your driveway for potential viewers, to making sure any essential home renovation and repair is complete, we’ve compiled some ways to prepare your home in the winter and help maximize your selling potential.
If you think selling your home in the winter is the same as selling your home in the summer, well, that’s a cold take. Each season has its distinct benefits when it comes to listing a home, so how can you take advantage of the snow and frigid temperatures?
We recently spoke with Amber van den Broek, a REALTOR® from Winnipeg, Manitoba and owner of Amber van den Broek & Associates, to speak about the advantages of selling your home in the winter.
“There’s less competition on the market during these slower months,” she says. “As a seller, you have the focused attention of all the buyers hunting for a home in your area, or even outside your location. When supply is low, demand for your property can be high simply by being the only option.”
If you’re thinking about selling your home in the winter, here are some tips on how to prepare for a successful sale.

Despite not being able to appreciate the lusciousness of your garden or lawn in the winter, landscaping shouldn’t be neglected.
“Landscaping is your ultimate first impression,” said van den Broek. “A buyer makes their initial decision of like versus don’t like in approximately 60 seconds, so the walk up or drive by shouldn’t be underestimated. A buyer will feel confident that seasonal maintenance has likely been completed, and that you’ve taken care of your home inside and out.”
As a rule of the proverbial green thumb, remove anything that’s unlikely to survive the winter so there aren’t dead plants in the garden. If you’d like to add plants and shrubs, be sure they’re the evergreen kind such as Blue Holly or Winter Heath. If you have pets, ensure you’ve removed any droppings and yellow snow before potential buyers show up. Even if your area doesn’t get much snow, make sure your front yard is well-kept, with any dead leaves raked up and thrown away.
Shovelling snow is twofold in terms of safety and removing the thoughts buyers conjure up of having to do it themselves. Consider installing solar-powered lights to help illuminate the path and be sure to salt/sand any walking paths to lower the risk of a fall for potential buyers.

Icicles are very pretty to look at, but they can wreak havoc on your home. Melted snow from your roof contributes to ice dams being formed in gutters, which in turn can cause water to back up into your home. The formation of icicles can also indicate issues with your roof or ventilation, which could be a red flag to potential buyers. While you can remove small icicles yourself—make sure to take all safety precautions if you need to venture onto the roof–it’s best to leave the removal of larger ones or hard-to-reach icicles to the experts.
Create a welcoming first impression by staging your front porch with durable furniture and winter-resistant blankets and rugs. Warm lighting provided by lanterns that can withstand the cold will also add to the charm. The backyard is just as important, so be sure to shovel patios and decks, and set it up in a way that highlights how the space can be used year-round.
This is technically an inside task, but it does involve elements from the outdoors. Salt, dirt, and snow all get tracked into your front entrance in the winter months, which isn’t visually appealing to potential buyers. You only get one chance at a first impression! Clean up any salt and dirt from your front entrance, and keep coats, mittens, boots, etc. in a closet so there’s no clutter when people come in.
Muddy footprints on the carpet? Professional cleaner Madison McCausland shared her tips on getting those stubborn stains out!

“Selling in the winter months gives home sellers an opportunity to create a very welcoming, cozy vibe to their space,” van den Broek explains. “Staging works, and winter is certainly a time to get creative. Ensure the home is at a comfortable temperature, and if there’s a fireplace, make sure it’s turned on, or lit if it’s wood. We always use candles at our open houses in the winter time, nicely scented like gingerbread, baking, apples, or pine.”
“Having a tray of treats always makes buyers feel at home, and if it’s closer to the holidays some decorated cookies or candy canes for kids. The more your house feels like a home, the more a buyer will start to feel AT home!”
Did you know the World Health Organization recommends a range of 20 C to 22 C as the ideal temperature in your home to maintain overall good health and wellbeing? Aim for this temperature during an open house to keep things comfortable. No need to go too warm—people will likely be wearing jackets!
Be proactive with ensuring cosmetic renovations such as chipped paint and drafty windows are complete prior to listing your home. For van den Broek there are some common red flags buyers look for when purchasing a home in the winter. These include:
Sealing windows to reduce air leaks, adding further insulation where required to prevent drafts, ensuring the weather stripping around your front door has no leaks, checking the insulation levels in your attic, and updating old furnaces can be beneficial upgrades for homeowners and enticing for potential buyers. If possible, consider having your furnace serviced by an HVAC professional to be certain everything is in tip-top shape.
Certain provinces are currently offering rebates to improve your home’s energy efficiency, which could help with the costs of some of these repairs or updates. For example, Enbridge is offering Ontarians “up to $5,000 in rebates for insulation, air sealing, new windows/doors, water heaters, boilers, furnaces, and home energy assessments.” British Columbia has a similar program through BetterHomesBC for up to $6,000. Check with your provincial energy provider to see what’s available to you!

If you’re planning festive celebrations, it’s best to avoid flashing lights and large decorations that could shrink the size of your space, as well as overtly religious ornaments.
“For outside it’s nice to have some winter décor welcoming buyers to the property—a simple wreath, flower pots with birch branches and twinkle lights, solar powered walkway lights, and pay attention to overall lighting outside.”

Even when you’ve succeeded in transforming the exterior and interior of your home to be both charming and inviting, if possible, show photos from other seasons in your listing because, the more guesswork you take out of the equation, the more a buyer can make an informed decision they feel comfortable with.
-560-wide.png)

Deep reds, bold blues, and neutral earth tones are leading the way for the top paint colours of 2023. See what companies like Sherwin-Williams, Benjamin Moore, Glidden, Behr, and Pantone have chosen as their colours of the year.
Refreshing the home is a big part of embracing the new year, and with so many potential changes from flooring to furniture, it’s hard to know where to start. Paint is a quick and easy way to freshen up any space or piece of furniture, and interior designers and paint companies have their predictions on emerging colour trends for 2023. Ranging from earthy reds to warm neutrals, here are the colours the pros say we’ll be painting our homes with and why they work.
 Image provided by Pantone, credit: Huge
Pantone’s highly anticipated Colour of the Year for 2023 was announced at the beginning of December. PANTONE 18-1750 Viva Magenta is meant to be a “brave and fearless” colour for those who have a “rebellious spirit” and exude optimism and joy. The bold colour lives in the red family, or what Pantone refers to as “The Magentaverse.”
“PANTONE 18-1750 Viva Magenta descends from the red family, and is inspired by the red of cochineal, one of the most precious dyes belonging to the natural dye family as well as one of the strongest and brightest the world has known,” said Leatrice Eiseman, Executive Director of the Pantone Colour Institute. “Rooted in the primordial, PANTONE 18-1750 Viva Magenta reconnects us to original matter. Invoking the forces of nature, PANTONE 18-1750 Viva Magenta galvanizes our spirit, helping us to build our inner strength.”
Though this isn’t a paint colour you can run to the store to purchase—Pantone’s Colour of the Year isn’t specifically a paint, just a colour—it serves as inspiration of what 2023 can bring. Pantone offers a set of designer tools to help you use their colours in your interior design projects.
 Image provided by Benjamin Moore Canada
Benjamin Moore’s 2022 colour of the year, October Mist, was an earthy green that resembled the stem of a flower. For 2023, their colour resembles the petals of a rose. Raspberry Blush is a vibrant red-orange that delivers bold personality. It’s charismatic without being loud, much like the electro-funk duo the paint company partnered with to commemorate this year’s selection. The Canadian electro-funk duo Chromeo has released a new song titled Raspberry Blush that reminisces about the positivity and enjoyment of colour and music together. Use this coral tinged pink on an accent wall, arch, or bring some colour to your powder or dining room.
You could also consider Terra Rosa by Dunn-Edwards if you’re into the soft clay colour.
 Photo via Behr Media Library
Sticking to more of a neutral hue, Behr has named Blank Canvas its 2023 Colour of the Year. A stark contrast to some of the other more vibrant colours, this creamy shade of white ushers in a clean and inviting blank slate. With this choice, Behr leans into a relaxing, calming colour that can offer endless décor possibilities. Blank Canvas can be paired with bold blues, browns, and greens. Use it in the bedroom to promote tranquillity or to finish off trim and moulding.
“Blank Canvas effortlessly offers a clean and inviting blank slate that allows individuality and creativity to flow freely,” Erika Woelfel, Vice-President of Color and Creative Services at Behr Paint Company, said in a press release. “This white easily harmonizes with a wide range of hues, including neutrals, earth tones and pastels for a charming and cozy appeal. Blank Canvas also pairs beautifully with black for a dramatic impact, and with bright accents like green or cobalt blue to instantly lift your mood.”
 Image provided by Sherwin-Williams
The Sherwin-Williams paint company is evoking a sense of connection, warmth, and softness with its pick for the year. Whether used in the living room or in the kitchen, the colour is the ideal choice to bring a sense of community and nature into your space. The colour also pairs well with earthy neutrals like dark beiges and greys.
“Redend Point was inspired by the idea of finding beauty beyond ourselves,” says Sue Wadden, Director of Colour Marketing at Sherwin-Williams. “Build on its earthiness by utilizing the hue alongside natural-looking textiles and wood accents or create a desert oasis by layering terracotta shades and clay materials.”
 Image provided by GLIDDEN Paint
Sticking with the earth tone colour theme of 2023, Glidden’s colour of the year is Vining Ivy. A mixture of blue and green, this in-between jewel-toned colour can be used in almost any space. The company chose a versatile colour so people don’t have to think so much about what works with their home.. The colour can be used as an accent to give a pop to your space or paired with soft pastels, light neutrals, or deep browns and blues.
“Consumers are seeking to simplify… as the past two years have shed a new light on the importance of serenity and little moments,” said Ashley McCollum, Glidden colour expert. “Vining Ivy embodies this vibe perfectly. Its versatility takes the guesswork out of design, leaving consumers with more time to indulge in the things that matter most to them.”
McCollum suggested using this colour on kitchen cabinets, as an accent wall, or in a smaller room to contrast a neutral palette.

This year we are seeing a movement towards clays, stones, and earth hues inspired by nature. Colours that bring calm, zen, and tranquillity are leading the way and people are being urged to paint their home in a way that brings comfort to them. These colours add a touch of calmness, optimism and hope in what’s ahead. So before you tackle your new painting project, consider whether these trending colours help showcase or inspire the feelings you’re chasing.

Have you ever wondered how you can transform an ordinary room into something extraordinary? With peel-and-stick wallpaper, you can easily and quickly decorate your home—especially if you’re a renter or like to redecorate often.
Install peel-and-stick wallpaper to add a pop of colour to bland walls, a subtle texture to a ceiling, or a fun pattern to walls, stair risers, and furniture. When compared to traditional wallpaper (which requires pasting), it’s much easier to install and remove. No commitment, no wall damage! Peel-and-stick wallpaper is typically sold by square foot, so your costs will depend on how large of a space you’re looking to cover. You can find it at local home improvement or craft stores for about $70 for 30 square feet, or online shops like Etsy for around $80 for 16 square feet—depending on the shop and material. Regular wallpaper typically costs around $45 for 56 square feet, but this doesn’t account for the other supplies you’ll need or the time you’ll spend applying it.
 Image via SweetWallpapers on Etsy
Using removable wallpaper makes wallpapering a fun DIY weekend project. Self-adhesive wallpaper peels away from its backing, adheres to the wall, and can be removed and repositioned easily—at least once before it possibly loses some of its stickiness. Consider temporary wallpaper if you’re looking for an easy and mess-free way to try a new style.
Find the square footage of the wall or space you want to cover and divide it by the square foot of one roll. If your wallpaper is patterned, you’ll need to add 20% to ensure the pattern matches on neighbouring strips. Then add an extra roll or two just in case of errors such as short cuts or tears. Also, it’s advised to order a sample of the wallpaper to make sure it’s exactly what you’re looking for before you place your full order.
You’ll need:
 Image via ScandinavianWorkshop on Etsy
It’s important for the surface to be clean and dry before installing peel-and-stick wallpaper. Give your walls and baseboards a wipe-down with a microfibre cloth to remove dust. If the area is greasy (like a kitchen backsplash) clean the surface with hot, soapy water and let dry. Remove outlet covers and move all furniture out of the way. If your walls are freshly painted, wait the recommended cure time before installing your wallpaper.
Measuring left to right from the corner, use a tape measure to measure the width of your first panel and mark with a pencil. Using a level, draw a straight line from top to bottom.
Measure the height of the area and cut strips to fit, adding eight to 20 centimetres to the bottom or sides—wherever the wallpaper will be lining up with the next piece. This accounts for any pattern matching. Large patterns might require more overhang.
Peel back about 20 centimetres of the backing on one strip. Line it up with the ceiling and the guide mark you made on the right. Stick the wallpaper to the wall and then slowly peel and stick the paper down the wall.
Use a smoothing tool to push out any air bubbles and to ensure the entire strip is securely attached. Once you reach the bottom, cut the overhang using a straight edge and a very sharp utility knife. Repeat until the wall is covered, paying special attention to matching your pattern at the seams.
Stand back and admire all your hard work!
Keep in mind, you don’t need to cover your entire room with peel-and-stick wallpaper design. Accent walls can be a striking way to add character to your room. Pick the wall that will work best—preferably the one that gets the most natural light—and, ta-da, a new look in your room with only a quarter of the work to do.
Elizabeth Rees, co-founder of Chasing Paper, told Apartment Therapy peel-and-stick wallpaper can last “as long as you’d like to keep it up” so long as you applied it to a clean, smooth surface.
 Image via WestCoastWalls on Etsy
As with any DIY project, there are many tips to help the task go as smoothly as possible.
There are many surfaces on which peel-and-stick wallpaper should not be used, as the adhesive may not adhere properly, or the wallpaper may not lay flat.
 Image via SandedEdgesFurniture on Instagram
There are plenty of peel-and-stick wallpapers on the market that can transform the look of any space, and they’re not just for walls! Here are some fun projects that use peel-and-stick wallpaper to add a little flair to your room!
Take the insides of your kitchen cabinets or the back of your bookshelves from boring to beautiful. You’ll love seeing a pop of fun every time you reach for a dinner plate.
In terms of application, this follows the same steps as if you were doing a wall, only on a smaller scale. You’ll need to measure, cut, and smooth the wallpaper into the drawer or onto the shelf, making sure there aren’t any air bubbles underneath.
If you’re looking for a quick and easy way to give your ceiling a fresh new look, peel-and-stick wallpaper is the way to go! Not only is it easy to install, it’s a great way to cover up any imperfections on your ceiling. You’ll want to recruit a helping hand for this project since you’ll be working against gravity, and four hands will be better than two. Note, this only works on flat ceilings as peel-and-stick wallpaper will not adhere properly to popcorn or textured surfaces.
Materials
Steps
Tip: If there are junction boxes in the ceiling for lighting, run the wallpaper over them. Use a sharp utility knife to cut a starburst into the wallpaper, starting from the centre of the fitting, outwards. You should be able to trim the excess and wrap the small overhanging edges into the box. Once the fixture is installed you won’t see any of the cuts.
 Image via StickerLime on Etsy
If you’re looking for an easy and relatively inexpensive way to add a touch of style to your stair risers, peel-and-stick wallpaper is a great option.
Materials
Steps
 Image via RockyMountainsDecals on Etsy
Peel-and-stick wallpaper is a beginner-friendly DIY project that can completely transform a room. The best thing about it is you just need to peel and stick it to the wall, no glue required. It’s also easy to remove, which is handy if you’re in a rental property.

After a long search you’ve finally found the perfect furry friend to bring home. Your world is about to change in the best way as flapping ears, a wagging tail, and a droopy tongue become your new normal. Before bringing home your new puppy or dog, there are important changes to make to ensure your pet is safe and happy in its new space, and that your home doesn’t get completely destroyed!

When it comes to floors and dogs, hardwood and carpet both have their pros and cons. Hardwood is good because it’s easy to clean paw marks, accidents, and shedding fur. The downside to hardwood is it can be easily scratched by long nails. Waxing floors often, clipping pet nails, and taking long walks with your puppy can help extend the life of your hardwood.
Of course, it’s not practical to completely redo your flooring from hardwood to carpet once you get a dog. However, opting for area rugs or carpet runners in high-activity areas could be a nice compromise.
With any carpet, whether it’s wall-to-wall or area rugs, be prepared to quickly clean any accidents with special cleaning solutions and odour eliminators. Accidents are going to happen, but cleaning a mess properly can make or break a repeat performance. Dogs will revisit spots where they smell their own urine, so be sure to clean the fibres well with a mixture of vinegar and baking soda and, if you can help it, don’t let the mess sit!

Understanding your dog’s habits is important when it comes to managing your plants. If they’re the curious type who often stick their noses in places they shouldn’t, you’ll want to put your plants on a shelf or hang them in a basket. In addition to just making a mess, your dog getting into your houseplants could be dangerous. There are common houseplants that can be toxic to pets, including:
For those who don’t want to skip the houseplants, but still keep things safe, pet-friendly plants include:
If you’re an animal and plant lover, these are some changes worth making to help your little paw-tner be protected and safe.

To any pup, the smell of a garbage bin can be fascinating—not to mention an open invitation for rummaging. Whether in the kitchen or bathroom, your bin likely contains harmful contents such as spoiled food, plastics, hygiene products, and tons of choking hazards. Keep your dog out with a covered trash can that lives in a cabinet or is elevated.
Moreover, take precaution and bring harmful trash, compost, and recycling immediately outside to the bin or down the garbage chute. In addition to chocolate, there are many foods that can be harmful to your dog if ingested, such as:
 Photo by Jamie Street on Unsplash

Even if you don’t consider yourself handy—and there’s no shame in that—having a well-equipped toolbox is a must for every homeowner. You never know when you’ll need to screw a cabinet handle back in, hammer down a floorboard, or tighten a loose pipe until a professional can do a permanent fix. Your toolbox doesn’t need to rival that of Tim “The Tool Man” Taylor’s, but there are some basics you’ll want to gather up.
We asked Mike Sexton, owner of Double Check Handyman and Shed On Site in Fredericton, New Brunswick, to give us some insight to the 10 tools every home should have.

This is probably the one everyone thinks of, but not all hammers are created equal.
“There are a couple of different kinds,” says Sexton. “Don’t get a framing hammer with a straight back, get a standard one. Hammers come in different weights, so get around a 16-ounce hammer.”
A comfortable grip is also key when choosing a hammer, and you can also find some with vibration-dampening coatings. Something else to look for is a flat head, rather than dimpled or checkered. This will avoid nail slippage when you do need to hammer something.

Anyone trying to put together furniture knows the importance of a wrench—more specifically, they know the frustration of not having the size you need. Adjustable wrenches are available, which you may think is the best choice as they give you different size options, but Sexton actually recommends having multiple wrench sets on hand.
“Get an adjustable wrench and a small set of metric and standard combination wrenches, which have an open end and a closed end, like a circle with ridges on the inside,” he explains. “The reason for this is often you need to hold a bolt on both ends to loosen it. The adjustable will hold one side, and the other wrenches will hold the other end.”

Whereas wrenches and hammers have specific criteria to look for, the same isn’t required for a tape measure.
“Almost any tape measure will do,” Sexton admits. “A 25-foot tape measure is best, and is still compact. There’s no need to get a high priced one.”
Skinnier tape measures are more susceptible to collapsing when you have them extended too far, so opting for one with a ¾-inch-wide tape is a good idea.

Phillips, flat, hexagon, square—there are multiple heads for screwdrivers, and those who are less handy may not always know what they’re looking for. So, when you’re adding a screwdriver to your toolbox, what should you choose?
“Either a set or a multi-tip screwdriver will work,” Sexton says. “I prefer a multi-tip, since there’s less looking around for stuff when you need it.”
A multi-tip screwdriver comes in a couple different varieties as well, so it all depends on personal preference. Some come with a case of removable magnetic tips you can swap in and out as needed. Others include all the tips in the handle with switches you push up to unveil the tip you need (think of those multi-coloured pens we used to have in high school).

Pliers can come in handy when you need to manipulate smaller objects, like when you’re trying to hammer a nail into something or bending a rogue staple back to avoid catching yourself on it. There are a few types of pliers, but there are only two you really need to consider for a basic toolkit.
“You can get a set of pliers, or a good pair of needle nose and something called ‘linesman’ pliers,” Sexton explains. “Those two will do the job 99% of the time.”
Sexton also specifically advises with pliers, you should invest a bit more in a quality pair or set. Ones that are too cheap can break quickly and end up causing more frustration than needed.

Though it sounds similar to a regular wrench set, Allen wrenches, also known as hex keys, are entirely different. These hexagon-headed tools are most recognized from the IKEA assembly method, and while they seem basic, they can definitely come in handy in a pinch.
“Make sure you buy a combination set of both metric and standard,” Sexton shares. “Most brands will do.”
Allen wrench sets can be purchased either as individual hex keys in a case, or hinged together like a Swiss Army knife so you don’t lose track of any size.

Moving into a new home usually involves hanging pictures and artwork on your walls, in which case you’ll want to invest in a level. These can also come in handy when setting up furniture to make sure the feet are all installed at an even height, letting you know if you need to add any jambs under one side.
“Don’t buy a discount level, most of them are not truly level,” Sexton cautions. “A small six-to-eight inch level is great. If you need to go up a size, then go for a two-foot level.”

You’re going to have a lot of boxes to open as you unpack your new home, and you never know when you’ll need to take on a handy project like replacing the screen in your windows. Having a utility knife on hand will make these jobs quicker and save the life of your scissors.
“Buy a normal size utility knife, not the miniature style,” Sexton suggests. “Also, make sure you have a pack of extra blades. You don’t need to get specialty blades, the standard blades will work for almost everything.”

Most of us have flashlights on our phones, so the idea of having a physical flashlight feels a bit silly. But while your phone flashlight may be great for a short while in the event of a power outage, Sexton explains having a headlight is actually better suited for your toolbox.
“You can get a normal flashlight, but I highly recommend getting a headlight with a band that goes around your head and has the light in the front. Alternatively, you could get one of each. You won’t always be able to hold a light while you’re using your hands to do things. I exclusively use headlights for work.”

Power tools might be intimidating to some, but having a drill or driver is a good idea for every home.
“A driver is a tool that looks like a drill, except it makes a quick hammering noise when turning,” Sexton explains. “Its purpose is to make driving difficult screws much easier. Having both a drill and a driver are great, but if I had to make a choice, I would default to a driver.”
If you’re getting a drill and driver, Sexton shares there are different options.
“You can get small drill bits that fit in a driver, and it can double duty as both. Ideally, you should get both a drill and a driver, and often they are sold in kits. Cordless is best, but don’t forget to charge the battery. Corded drills can work, but drivers are typically only available as cordless.”
Ready to take it a step further? Build yourself a functional starter workshop with these six tools.
In addition to these 10 tools, Sexton shared a few other things you might want to consider keeping in your toolkit.

So if you’re not a handyperson, it’s always advised to call in the professionals when things go wrong. However, having these tools in your home can be gamechangers in the event of an emergency.

Design trends come and go each year, and it’s always an exciting undertaking for interior designers to explore the current and upcoming design themes for condos, townhouses and single-family homes. When we think about these trends, however, we often overlook architecture or building design and instead tend to focus on fun, non-structural elements such as colours, materials, textures and accessories.
What’s interesting about this is the fact that architectural trends are a key consideration for both the government and developers when it comes to constructing new homes.
“Guidelines are developed in collaboration with city staff, developers, planners, and architects,” says Melanie Doytchinova of Kirkor Architects & Planners, based out of Toronto, Ontario, and Calgary, Alberta. “These guidelines are essentially the new trends being set by the government with the intent to improve quality of life and provide a better mix of housing types to support people at different stages in life.”
What’s clear is our modern lives significantly impact the design of our homes and the unique architectural trends and designs we see emerging.
 Image via Bill Mead, Unsplash
With an ongoing emphasis on climate change awareness and sustainability, designing and building with the environment in mind remains a top priority for many builders and homeowners. Incorporating sustainable practices, techniques and materials in new builds—as well as updating older buildings—has become the new standard.
Homeowners are looking for something adaptable, affordable, and sustainable. As well as being good for the environment, eco-friendly designs often go hand-in-hand with long-term cost efficiency of our homes. Whether it’s through the use of solar panels, recycled house materials, water-efficient plumbing fixtures, insulation and air tightness, or being mindful of window and door selections for energy reduction, it seems there’s a conscious effort to support the planet. This effort is reinforced by the range of government-backed clean energy incentives and rebate programs in operation across the country.
Curious about the relationship between architecture and how we interact with the place we live? Episode 27 of the REAL TIME podcast features Canadian architect Todd Saunders, who shares his perspective.

Specifically, in relation to windows, Doytchinova mentions large windows are a “trend we’ll be moving away from” as there are guidelines related to sustainability minimizing window-to-wall ratios in order to make new construction more energy efficient. “We’ll start seeing the trend of the ‘glass towers’ move more and more into solid wall construction with punched-in windows,” she suggests.
Despite the aesthetic appeal of large windows and the uplifting psychological effect they have on us when natural light floods through them and brightens up our homes, energy efficiency also needs to be taken into account. When coupled with the known fact that windows are (usually) the main cause of energy loss in our homes, it becomes clear why minimizing the window-to-wall ratio helps to reduce energy consumption.
 Image via Francesca Tosolini, Unsplash
Design flexibility allows residential buildings to evolve over time as requirements, likes, and dislikes change. In terms of adaptability, this could include elements like moveable partitions, a room’s ability to expand, multi-use spaces, or even furniture that can be repositioned without making a permanent change to the building.
“Designing more adaptable units by using movable walls, fold away furniture, demountable partitions, prefabricated elements, or modules rather than drywall and framing could be a future trend,” says Doytchinova.
“The trend is to build in a way that’s flexible and allows for alterations, like adding or removing walls and partitions to accommodate a household’s needs for space during varying life stages,” Doytchinova adds. “Therefore, it’s encouraged to use alternative construction systems that can be easily repurposed. We’re encouraged to prioritize using columns for the building structure rather than shear walls in order to be able to, one day, combine rooms or apartments and adapt layouts.”

Closely related to design flexibility is the trend—and requirement, for many—towards more space.
“In the last few decades, contemporary unit sizes, layouts, and amenity spaces have been designed and marketed to smaller households without children,” says Doytchinova. “Now, the objective is to ensure new developments respond to all segments of the population with a range of housing types.”

Green is considered the most restful color for the eye.Combining the refreshing quality of blue and the cheerfulness of yellow, green is suited for almost any room in the house.In the kitchen, green cools things down; in a family room or living room, it encourages unwinding but has enough warmth to promote comfort and togetherness.
Green also has a calming effect when used as a main color for decorating.It is believed to relieve stress by helping people relax.It is also believed to help with fertility, making it a great choice for the bedroom.

Yellow captures the joy of sunshine and communicates happiness. It is an excellent choice for kitchens, dining rooms and bathrooms, where it is energizing and uplifting. In halls, entries and small spaces, yellow can feel expansive and welcoming. Even though yellow although is a cheery color, it is not a good choice for main color schemes. Studies show that people are more likely to lose their temper in a yellow interior. Babies also seem to cry more in yellow rooms. In large amounts, this color tends to create feelings of frustration and anger. In chromotherapy, yellow is believed to stimulate the nerves and purify the body.

Red raises a room's energy level.The most intense color, it pumps the adrenaline like no other hue.It is a good choice when you want to stir up excitement, particularly at night.In the living room or dining room, red draws people together and stimulates conversation.In an entryway, it creates a strong first impression.
Red has been known to raise blood pressure and speed respiration and heart rate.It is usually considered too stimulating for bedrooms, but if you're typically in the room only after dark, you'll be seeing it mostly by lamplight when the color will appear muted, rich and elegant.
Over the course of the pandemic, homeowners have been re-evaluating what they need most out of their property. For some, this has meant packing up and downsizing to a smaller city or community for greater living space, privacy, and a more relaxed pace of life.
Both statistically and anecdotally, we’ve witnessed buyers moving to the suburbs and other rural areas over the past two years. Small towns like Squamish, Wasaga Beach, Kingston, and Collingwood have been home to some of Canada’s fastest growing populations lately, a trend largely attributed to residents moving from urban centres in search of more affordable housing, according to a report from RBC Economics.
 Image via Pexels
Right now, there are two main reasons buyers are flocking to smaller Canadian cities—affordability and lifestyle.
Colin Breadner, a REALTOR® with One Oak Group at eXp Realty in Prince George, British Columbia, explains over the past two years, he’s helped more people move from larger cities to Prince George than he has in the last 15 years. Many of these buyers are from British Columbia’s Lower Mainland, and several from Ontario. Most purchasers are in their late 20s and early 30s, said Breadner, and have been struggling to get ahead in the country’s more expensive markets.
“Our cost of living is low enough that people who are starting off, if they come up here and work for a while, they can really get ahead,” Breadner said. “I know the people who have been moving up here are just basically priced out.”
 Image via Unsplash
For Ryan O’Donnell, a REALTOR® with RE/MAX Park Place in Sydney, Nova Scotia, the Cape Breton market has been driven by out-of-province buyers since the pandemic began, a pattern that was present even leading up to the COVID-19 pandemic. After years of outward population migration, the tides have started to turn as younger home buyers have returned to the Cape Breton area thanks to remote working and comparatively affordable real estate prices. Communities like Sydney offer everyday amenities, with the added benefit of a country lifestyle close to a downtown district.
“The pandemic really opened a lot of people’s eyes on what’s really important in life,” said O’Donnell. “Cape Breton, I think, offers a quieter, slower pace of life that is a little more laid back.”
Buyers who are flocking to Canada’s smaller cities are in search of all kinds of properties.
Dale Devereaux, a broker and co-owner with Century 21 Maximum in Red Deer, Alberta, explains many people are looking for more space.
“We’ve certainly seen a lot of people who have been working out of their homes and the home feels like an office,” said Devereaux. “I think you’ve seen some people take on some properties that are a little bit bigger, [and have] a little bit more room for the family so the office isn’t the living room.”
Compared to the rest of the country, Alberta’s real estate market experienced a downward trend during the first half of the pandemic, but has seen sales increase within the last year, explains Devereaux. Job opportunities and construction investments have piqued buyer interest, especially out-of-province buyers who are looking for income properties. In many cases, purchasers have relocated to Red Deer—conveniently located in between Edmonton and Calgary—to stretch their dollar and still be close to the bigger cities.
 Image via Unsplash
Devereaux explains, “Maybe their kids have lived here for a few years, they’ve gotten a little bit older themselves, their homes have gotten to a price where they are now worth over $1 million. They can come here, buy a home for $400,000 or $500,000, put some money in their pockets and be close to their kids. That’s the biggest movement I saw last year.”
In Cape Breton, purchasers have been interested in all kinds of housing options, including farming, waterfront and income properties, said O’Donnell. Cape Breton University attracts a large international student population into Sydney, which has opened opportunities for those looking to purchase property. The rise of remote working, which has enabled some buyers to move around the country with ease, has also played a role in what purchasers are looking for in a home.
“[If] they like the house and the property, they’re asking about the internet connection because they used to be based out of Toronto and they now have an opportunity to work the same job [from home]. I’ve seen a lot of people who are moving here for that reason,” said O’Donnell.
If you’re looking to make the switch to smaller city living, there can be many upsides.
In Prince George, Breadner explains the benefits are purely lifestyle oriented. For one, it’s typically a shorter commute to amenities and workplaces. In larger centres where rental costs are higher, saving for a downpayment can be much more difficult, but smaller communities can offer a lower barrier to entering homeownership.
“You can buy a newer home here for probably half or a quarter of a big city. You can jump on an airplane and be in Vancouver, Calgary, [or] Edmonton within an hour if you want to go to those areas. And, because we have such a lower cost of living, you can afford those things,” said Breadner.
 Image via Pexels
Those who crave small-town living with urban conveniences may also find comfort in smaller cities. In addition to restaurants, businesses, and recreational opportunities like golf courses and lakes, Devereaux said Red Deer has a prominent volunteer community and a close-knit feel that people are drawn to.
“You can walk somewhere and you’ll run into five people and you can say ‘Hey, how are you doing today? How are your kids?’ We still have that feel to it even though we’re 100,000 people,” he said.
If you are considering buying in any of Canada’s smaller cities, consult the advice of a local REALTOR® for the best market insights.

Whether you’re hoping for lush flower beds bursting with perennials or you want to grow herbs and vegetables for the first time, now’s the perfect time to start planning your garden. Though you may need to wait a bit before you can start planting—typically once the ground has thawed and there’s no longer a risk of frost—getting a head start on the plan itself can help you visualize the end state of your garden. We asked Halifax gardening expert Niki Jabbour, author of Growing Under Cover, for her best tips to build a lovely garden that will enhance your curb appeal.

Before you race off to empty your wallet at the garden centre, take some time to plan. Consider drawing out a rough sketch of your space and priorities, suggests Jabbour.
“Having a plan on paper helps keep you on track and on budget. Perhaps this year, you can tackle the front yard and next year the back of the property, or just start with an island bed or foundation planting,” she says.
Then, evaluate your growing conditions so you can choose plants that will thrive: do you have an open space with lots of light, some shading from nearby trees, or deep shade beneath tall trees? Your plan will also depend on the overall type of garden you’re looking to plant. Vegetable gardens may require a different setup than perennial or flower gardens, for example.

Thanks to plant breeders, gardeners have a huge selection of low-maintenance trees, shrubs, and perennials to choose from, including many varieties designed for urban landscapes or small-spaced yards, says Jabbour.
“When selecting plants, be sure to read the size description on the tag: how tall and wide will it grow? Make sure you have a spot that can accommodate its growth,” she says. “If you see the words ‘ground cover’, understand it’s a spreading plant that may take over your garden. I avoid plants that spread aggressively and aim to pick perennials that form tidy clumps to reduce maintenance.”
You may want to have your soil tested by a professional landscaping company to see if you need to add nutrients.

As a year-round vegetable gardener, Jabbour believes all landscapes should include edible plants, which provide delicious food and add beautiful elements to your garden, while attracting and supporting pollinators.
“You can create a stunning hedge with high bush blueberries, use strawberries for edging garden beds, tuck lacinato kale amongst perennials, or include curly parsley in container gardens for long-lasting texture and beauty,” she says.
Want to grow your own food? Start by building a simple four-by-eight-foot raised bed, or gather a few large containers for your patio, advises Jabbour. Since most types of vegetables and herbs need lots of light—at least eight hours of full sun each day—choose plant varieties that suit your garden conditions.
“If you don’t have a full sun, stick to vegetables like leaf lettuce, spinach, and kale that can be grown with just three to four hours of sun each day. A raised bed is ideal as it offers excellent soil drainage and is easier to tend than a traditional in-ground garden,” adds Jabbour.
You can find a list of vegetables that don’t require full sun here.
Easy to grow vegetables that don’t need much maintenance include bush cucumbers, potatoes, zucchini, cherry tomatoes, peas, and bush beans.
“If you’re short on space, skip vining vegetables like cucumbers, pumpkins, and winter squash, which can use up large areas. Or, grow them vertically: I love growing vining cucumbers, pole beans, melons, and small fruited pumpkins on trellises. It allows me to grow more food without digging a new bed, but it is also good for the plants. They’re less prone to disease and insect problems and it makes harvesting a snap,” she says.

Weather affects the timing of planting trees, shrubs and perennials, and how well they settle into your garden, so plant these items in the spring before the hot, dry weather takes over.
“You can help give trees, shrubs, and perennials a good start in your garden by watering new plants deeply each week. Once they’re established, you won’t need to water as frequently,” says Jabbour, who also mulches with straw to conserve soil moisture.
With a little know-how, your spring garden will blossom all season!
Whether you’ve bought a fixer-upper, or your property simply needs an update, homeowners may find themselves confronted with multiple renovations at a time. Upgrading your home can also be contagious—once you update one room, it can feel tempting to do them all. If you’re looking at several home renovations on your to-do list, where do you even start? How do you decide what projects come first and what tasks can sit on the back burner?
Rebecca Hay, president and principal designer of Rebecca Hay Designs, gives us some pointers on how to prioritize home renovations.
 Image via Unsplash
You have several areas of your home that need a renovation—the kitchen is dated, the entryway isn’t functional, and the bathroom fixtures are in need of a facelift. So which room comes first?
Hay explains homeowners should start with the areas they get the most use out of, and the rooms that are going to get the best return when they decide to sell their home.
“That’s typically your kitchen and then any bathroom,” she said. “Those are the bigger-ticket items, but if you do those first, the other updates can be done over time and are more budget-friendly.”
To cut down on prolonged expenses and disruptions, it’s easier to renovate the bigger, messier projects first to get them out of the way. Focusing on large renovations that get everyday use, Hay said, can also improve your lifestyle and use of the home, while also communicating value to potential home buyers.

With any renovation, it can be exciting to pick out wallpaper and new lighting as you decorate your space. However, the structural integrity and health of your home should always come before any surface-level renovation. If your roof needs to be replaced or your window trim is rotting, those tasks should take precedence.
“You always want to prioritize that before any cosmetic renovation, because those are the non-negotiables,” explains Hay. “I would say start with those non-negotiables and maintain the bone structure of your home to make sure it’s safe and sound and healthy, and then you can put together all of these other things.”
The time of year—and the time in your life—can help determine which projects take priority.
If you’re a young family with children, your renovation needs will be different than someone who is heading into retirement, which could dictate which projects you start first and how you change your space. For instance, Hay started a renovation on her own kitchen to open up the floorplan to allow in more natural light, improve functionally, and provide better sight lines to her children. Compared to empty nester clients, they have different needs for the same space.
“They don’t care about watching children run around unless they have grandchildren, but they do want to keep it so they can entertain openly, be prepping in the kitchen often while guests are sipping a glass of wine, maybe they’re at the (kitchen) island,” said Hay. “The stage of life you’re at will 100% affect the use of your space, especially your kitchen.”
 Image via Unsplash
The Canadian climate may also determine when you pull the trigger on a renovation. Hay explains the summer is the busiest time of the year to renovate thanks to favourable weather, but it means contractors may not have as much availability. On the other hand, trades have more openings in the fall and winter seasons, but ice and snowy weather can prevent certain tasks from being completed.
“Seasonality is a huge part because it gets so cold in the winter months,” said Hay. “If you want to tackle an exterior renovation, whether it be a porch or any exterior painting, those things can’t be done in the winter.”
If funds allow, lumping multiple renovation tasks together can cut down on expenses and time spent renovating versus spreading them over a series of phases.
For example, if you have a plumber working on your kitchen, it might be worth renovating your bathroom at the same time since the tradesperson is already onsite.
“If you can group similar types of renovations together, that’s definitely going to help for cost savings, for example, opening up a shared wall in the dining room and kitchen. I’d say for bathrooms and kitchens, if you have the budget to do them at the same time, I would because there are similar trades involved,” said Hay.
Oftentimes, renovating can be exhausting and homeowners can run into decision fatigue where they feel thrown out of routine and start to lose sight of the big picture. If you can, Hay suggests it might be worth temporarily moving out and completing all of the renovations at one time.
“If you just start doing one room at a time, then you’re forced to make decisions based on previous decisions and it doesn’t always work cohesively,” said Hay.
If you do end up grouping projects together, or the one project you take on is large enough, you’ll likely want to call in a professional to help you manage all the timelines, tradespeople, deliveries, etc. When you work with a contractor or designer, they’ll handle these moving parts for you, but taking on the renovations yourself means they’ll be in your hands. Enlisting the help of a professional can help cut down on stress and let you focus on the big picture rather than the nitty gritty. If you need recommendations for a contractor or a designer, a REALTOR® will be able to provide some contacts.
 Image via Pexels
Even if you’re planning to put your home on the market within the next few years, you can renovate strategically to get the home you want and still appeal to buyers.
When renovating for sale, Hay said curb appeal can be an important component to consider, as the front of the home is the first impression for any purchaser.
However, Hay explains it’s important for homeowners to renovate what works for them and their family. It’s a personal decision, and future buyers who have different needs for the space may opt to renovate the property once they move in.
“You make those big picture decisions, structurally and functionality-wise, that will appeal for resale and that work for you, but when it comes to the aesthetics and the type of tile and the drapery, pick what works for you because the next homeowner might just switch it out anyway,” said Hay.
If you’re planning to sell your home, enlist the advice of an experienced REALTOR® to get an idea on what areas of your home may be worth upgrading before hitting the market.

A new year can mean new resolutions, and while a lot of people focus on things like getting healthier or learning a new skill, there’s another popular resolution to consider: a better cleaning routine! It can be hard to keep on top of household cleaning as it starts to pile up, but by following a checklist you can make sure your home stays spick and span all through the year.
We spoke with Nina Duque and Hillary Tan-Ortiz of Overdue Solutions, a cleaning and organizing service operating in the Greater Toronto Area, to get their best cleaning tips. They also shared a pretty compelling reason as to why cleaning should happen more frequently.
“Peace of mind! We can’t stress enough that a decluttered house helps declutter your mind. Also, the longer the wait, the harder it is to clean—residue and dust build up is never fun,” said Hillary.
Here are some guidelines and helpful hints from Overdue Solutions to encourage your New Year’s resolution!

Not everyone has the time (or the patience) to do a major house clean on a weekly basis, and that’s OK. Thorough house cleans, which include purging unused items, can happen less frequently than other chores.
“For high traffic areas like kitchens and bathrooms, we recommend a deep clean at least every two weeks,” Duque explained. “For other spaces in the home, try to schedule a monthly clean-up that not only involves cleaning, but also purging items that don’t belong in each area. That stack of mail sitting by your front door? Sort it or shred it. The pile of shoes in your front foyer area or mudroom? Lay out the ones you use the most for easy access and put away the ones that aren’t in season. There’s always something that needs to be returned to its rightful place in the home—or needs to find its place!”

When it does come time to clean, looking at everything at once can be a bit overwhelming. Overdue Solutions suggests starting with a specific task first so you can get the lay of the land.
“We always recommend dusting a space first so you can get a better sense of how much needs to be cleaned on different surfaces,” Tan-Ortiz shared. “Dusting also allows any excess particles to fall to the ground for clean-up on the floor last. When in doubt, always approach a clean-up from ‘top to bottom.’ Start with higher surfaces first and do the floor last.”
This is their recommended order for completing your cleaning:
The duo also suggests breaking your cleaning into rooms versus tasks, which can help you feel more accomplished as you go along.
“The best approach is to tackle one space at a time,” Duque explained. “By focusing on one room at a time, you’re allowing yourself to visually see your progress and walk away knowing an area is done. We find attempting to approach your cleaning by ‘task’ can sometimes lead to underestimating how large a task can be or how long it may take. For example, vacuuming a whole house takes time to apply carpet odour removal, change filters, and move around furniture which sometimes leads to other discoveries that sidetrack your vacuuming.”

Now that we know when to clean, it’s time to figure out what to clean! Overdue Solutions gave us their recommended cleaning checklist you should follow on a weekly basis:
Printing out this list—or writing it out every week as you get ready to start—is a good way to keep yourself accountable and tick things off as you go! Crossing things off a list is always satisfying, so why not use it to your advantage?
Feeling inspired? Take our 7-day cleaning challenge and see what a difference it can make. Download our printable checklist and give your home a deep clean.

Sticking to a cleaning routine is a great New Year’s resolution to strive for! With these tips from Overdue Solutions, you’ll have everything you need to succeed—and to keep your house spick and span all year round.
Flipping homes has been all the rage over the last few years. This is partly due to the popularity of television shows like “flip or flop”, that turn dilapidated properties into money-making showstoppers in record time. The reality is you don’t get to see the actual behind-the-scenes from start to finish. The process of finding a home, fixing it, and then selling is not as glamorous and easy as it looks on TV, especially if you’re a rookie. However, you can be successful if you work with the right REALTOR® and know what to look for.
 Image via Pixabay
The flipping process can be tedious, so you’ll need a lot of “patience, perseverance, and problem-solving skills,” noted Khan. Try to hone these traits even before you begin to look for a home, so you’re prepared to handle potential roadblocks.
“Flipping is a business transaction and you are the business owner who manages everything,” said Khan. “You need certain soft skills and the ability to make smart decisions quickly to be successful. Also, don’t fear too much and don’t overthink either.”
 Image via Pixabay
It’s crucial you have some real estate knowledge and understand the market where you want to buy. This means narrowing down your search area to focus your research. Dig into market history, uncover buyer and neighbourhood trends and make sure to ask yourself these questions: What are the average sale prices? Are new developments cropping up? How long does it take for homes to sell on average?
Khan emphasized how important it is to “study the history of the market and look at current trends and predictions for the future.” Ultimately, using a REALTOR® to help you through the process is your best bet, as they’ll be able to give you insights and trends for a certain area using their market expertise, professional experience and access to data and tools.
 Image via Unsplash
You can fix many things about a home, but you can’t change its location. According to Khan, “location determines your market value before anything else.” If you don’t pick a good community, you could end up with a property that generates no return on investment. You should generally avoid areas on the extreme ends of the low and high scale.
Look for property in a growing neighbourhood with lots of appeal and potential to scale. For first-time flippers, don’t seek out property far from where you currently reside. You’ll want easy access to the home, so you know exactly what it looks like before, during, and after the flip.
 Image via Unsplash
Seek out expert opinions
Flipping a home isn’t a solo task. Work with a REALTOR® to help with your market research, property search, and purchase strategy. They can also help you understand property laws and regulations—for example, obtaining a zoning permit—and what you’ll need to do before starting actual work on the home. From electricians, plumbers, roofers to HVAC professionals, REALTORS® are also an excellent resource for finding trusted professionals in your local neighbourhood.
Before making an offer, you should also have the property inspected for potential issues not visible to the naked or experienced eye. This includes mould, roof problems, and foundation cracks.
Contractors, such as plumbers and electricians, will be able to provide you with a proper assessment of the home and give you price and timeline estimates. According to Khan, these experts will also help you avoid making mistakes that could void your insurance.
 Image via Unsplash
Not all fixes and updates add value to your property. Prioritize refurbishing the exterior, bathrooms, and kitchen.
“Kitchens tend to be a deal-breaker for a lot of buyers,” said Khan. “A home can have the best flooring in the world, but if the kitchen is slightly outdated, say by 10 years or more, it can bring the whole value down.”
 Image via Unsplash
It’s not always about the big details either. The small upgrades matter a lot, too. Keep in mind buyers nowadays are attracted to modern aesthetics with luxurious must-have features (think stone countertops, white cabinets, open concept rooms, double sinks, rainfall showerheads, a theatre room, etc.). This trend has become even more popular during the COVID-19 pandemic.
“People couldn’t go anywhere for nearly two years, so they brought luxury to their homes. This same luxury is what they expect to see when they’re buying property,” added Khan.
Flipping a home is no small feat, but it can become a lot harder when you pick a property not primed to sell. To make sure you’re finding a good home to flip, be sure to seek out expert opinions, including those of a REALTOR®, before purchasing!
Whether you’re a first-time home buyer or a seasoned property owner, shopping around for a mortgage lender can feel daunting.
With multiple companies, interest rates, and options to look over, finding the best lender for your specific needs can appear overwhelming. However, mortgage brokers and specialists have the tools and knowledge at their fingertips to help borrowers make informed decisions about their home financing.
 Image via Pexels
To tell us more about what to look for when choosing a mortgage lender, we recruited the advice of Carrie Cardinal from Realtyone Real Estate Services Inc. and Ryan Mollberg with M Realty, both of whom are Saskatchewan-based mortgage brokers and REALTORS®.
Mortgage lenders in Canada can be organized into three main categories:
Mollberg explains while banks and other major financial institutions are considered to be A lenders, monoline lenders also fall under this category. Unlike banks who offer multiple services like credit cards, investments and bank accounts, monoline lenders specialize primarily in mortgage loans.
 Image via James Bombales
“Banks have a bank status,” explained Mollberg. “They’ll do primarily A-business, but then what makes mortgage brokers as successful as we are is options other than banks, and there are these lenders we call monoline lenders, meaning they just do one thing and that’s mortgages.”
When looking for recommendations on A, B, or private lenders, Mollberg and Cardinal point to mortgage brokers as a good starting point. With access to dozens of mortgage lenders, brokers can help borrowers compare and one-stop shop for the best mortgage free of charge. Cardinal explains mortgage shoppers can also compare terms and interest rates between lenders easily online.
“That’s where, [for] a lot of the research, people can do a lot of online, but in my opinion, finding someone who has unbiased advice to a certain lender is where you’re going to get as much information as possible,” she said.
During those first few conversations with your mortgage broker or bank, you’ll want to ask questions about your payments, property taxes, and mortgage portability options.
The early stages of finding a mortgage involves figuring out how much you can realistically afford with REALTOR.ca’s mortgage calculators, a pre-approval process, which assesses your credit history, employment, and down payment to determine how big of a mortgage loan you qualify for. Mollberg explains each lender is different and will have its own set of mortgage policies, but a broker can help borrowers understand these guidelines and determine which lender will suit their individual circumstances.

“This is again another challenge, and this is where having a mortgage broker is good because they can help navigate those waters and say ‘Okay, well, you’re buying in small-town Saskatchewan, you’re self-employed, your down payment is coming from your parents, and you’ve only been at your job for nine months. What lender will do that for you?’” said Mollberg.
“That’s what a mortgage broker does. They’ll help sift that out for you and figure out where to place the mortgage,” he added.
During those initial meetings with your mortgage broker, Mollberg said it’s important to ask what lenders they may have in mind for you. This also includes asking your broker the differences between bank and monoline lenders. For example, prepayment privileges—an additional sum you can make on top of your regular mortgage payments—are often one of the biggest differences between the two.
Cardinal explains borrowers may also want to ask about extra payments on your mortgage and how many you’re entitled to per year, the mortgage renewal process, and if your lender allows property taxes to be collected with your mortgage. Portability is another crucial factor to talk about when discussing mortgages, Cardinal said, as you’ll want to know if it’s possible to transport your mortgage in the event that you need to move houses.
You’ll also want to confirm the cost of any penalties for paying out your mortgage early, which may impact the length of the mortgage term—the period and interest rate.
 Image via Pexels
“If you have to pay it out early for whatever circumstance, what are you going to be looking at as far as a penalty?” said Cardinal.
“Because the interest rate differential penalties right now are really, really high, it’s important you know what you’re getting into and not over commit on a term. I often say to my clients, ‘Rather than committing for five years, if you’re unsure, maybe just doing two or three years may be better for you,’” she added.
It’s easy to just think about numbers when shopping for a mortgage lender, but customer service and communication are essential to consider too.
“Customer service is key,” said Cardinal. “When you have a problem, you want to be able to reach someone and get the problem resolved.”
Mollberg explains it’s important for lenders to have a good online customer portal. This is where clients can make payments, gather mortgage statements, and get other detailed information. Cardinal said a borrower should find a representative easy to access. A common frustration among her clients is calling an 800-number and not being able to get to the person they need.
When it comes to buying and selling real estate, REALTORS® and mortgage brokers often work alongside one another to get borrowers into the home they want.
“As a REALTOR®, setting up with a good mortgage lender is key because having a fully qualified buyer is the way we’re able to make dreams come true,” said Cardinal. “At the end of the day, if somebody isn’t qualified, they cannot sell a house, they cannot buy a house, and that ends up being a really difficult process.”
If you’re looking for recommendations on a mortgage specialist or are new to the home buying process, consult the help of a local REALTOR® for guidance at every step of the way.

